
Insulation From the Inside Out: A Homeowner's Complete Overview

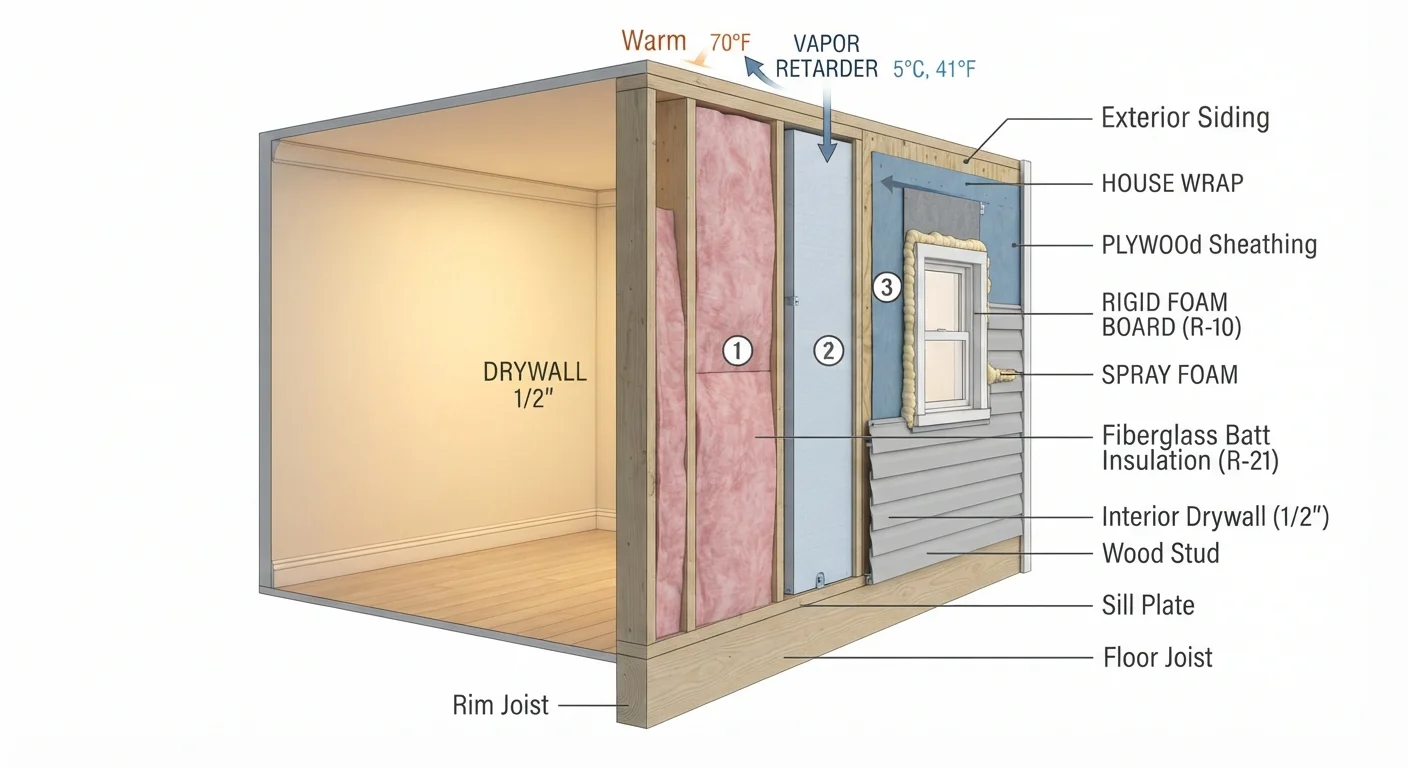
Photo: ScoutAnswers.com | Blogs That Ignite Curiosity editorial
Key Takeaways
- R-value measures thermal resistance - higher values mean better insulation performance.
- Batts, blown-in, spray foam, and rigid board each suit different locations and budgets.
- Air sealing before insulating dramatically improves overall effectiveness.
- Some insulation work - especially spray foam and attic retrofits - is best left to professionals.
- Local climate zone should guide target R-values for each area of your home.
How Insulation Actually Works
Insulation slows the transfer of heat between spaces. In winter, it keeps warmth inside; in summer, it resists heat moving in from outdoors. Most insulation materials do this by trapping tiny pockets of air, which is a poor conductor of heat. The denser and more continuous that air-trapping structure is, the better the material performs.
Heat moves through buildings in three ways: conduction (direct transfer through solid materials), convection (movement through air currents), and radiation (energy transmitted across open space). Good insulation addresses at least the first two. Radiant barriers - reflective foil products - target the third and are common in hot climates, particularly in attic spaces.
One point many homeowners miss: insulation alone is not enough. Gaps, cracks, and penetrations allow conditioned air to escape before insulation ever has a chance to work. Air sealing - filling those openings with caulk, foam backer rod, or weatherstripping - must come first. It is worth checking areas homeowners often overlook during renovation, because many critical air-leakage points go unaddressed even in otherwise careful projects.
Understanding R-Value
R-value is the standard measure of thermal resistance for insulation. The higher the R-value, the more resistant the material is to heat flow. R-values are additive - two layers of R-13 batt insulation produce roughly R-26 when installed correctly without compression or gaps.
The U.S. Department of Energy divides the country into climate zones and publishes recommended R-values for different parts of a home. A home in Minnesota needs substantially more insulation than one in Florida, particularly in the attic, which is typically the greatest source of heat loss and gain. Recommended attic R-values range from around R-30 in mild climates to R-60 or higher in cold northern zones.
For a deeper look at how R-value also applies to windows and other building envelope components, understanding R-value and U-factor together provides helpful context on the full picture of home energy performance.
R-49 to R-60
Recommended attic R-value in cold climates
The U.S. Department of Energy recommends these ranges for Climate Zones 6-8, covering much of the northern United States.
~25-30%
Heat loss through an uninsulated attic
The U.S. Department of Energy estimates that a significant share of home heating and cooling energy escapes through the attic in under-insulated homes.
R-6 to R-7
R-value per inch of closed-cell spray foam
Closed-cell polyurethane foam provides one of the highest R-values per inch of any widely available residential insulation material.
Common Insulation Types Explained
Each insulation material has distinct properties that make it well suited - or poorly suited - for specific applications.
- Fiberglass batts: The most familiar form, sold in pre-cut rolls or sheets sized to fit standard stud and joist spacing. Easy for DIYers to handle, though proper installation - without compression or gaps - is essential to achieving rated R-values.
- Mineral wool (rock wool) batts: Similar in form to fiberglass but made from volcanic rock or slag. Naturally fire-resistant and better at dampening sound. Slightly higher cost, but useful where fire or acoustics are priorities.
- Blown-in (loose-fill) insulation: Cellulose or fiberglass particles blown into wall cavities and attics using a hose machine. Excellent for retrofitting existing spaces without demolition. Cellulose, made from recycled paper, is treated with fire retardant and offers good density to resist air movement.
- Spray polyurethane foam (SPF): Applied as a liquid that expands and hardens, filling gaps as it cures. Open-cell foam is softer and vapor-permeable; closed-cell foam is rigid, moisture-resistant, and delivers very high R-value per inch (around R-6 to R-7). Closed-cell foam also adds structural rigidity to wall assemblies.
- Rigid foam board: Panels of expanded polystyrene (EPS), extruded polystyrene (XPS), or polyisocyanurate (polyiso). High R-value per inch, moisture-resistant, and useful for continuous insulation layers on exterior walls and foundations.
When adding blown-in insulation to an existing attic, install attic baffles at each rafter bay before blowing in material - this preserves ventilation channels and prevents the insulation from blocking soffit vents.
In mixed and cold climates, use a hybrid assembly - closed-cell foam on the interior of rim joists rather than cut-and-cobble rigid foam - to eliminate air leakage at one of the most common weak points in a basement envelope.
Where Each Type Belongs in Your Home
Matching insulation type to location is as important as selecting the right R-value.
- Attic floors (open attics):
- Blown-in cellulose or fiberglass is often the most practical and cost-effective choice here, especially in existing homes. Batts work well in new construction with accessible joist bays.
- Cathedral ceilings and unvented roof assemblies:
- Closed-cell spray foam or a combination of rigid foam and batts (hybrid assembly) is typically required to manage moisture in unvented spaces. This is complex work - consult a building science professional or qualified contractor.
- Exterior walls (new construction):
- Fiberglass or mineral wool batts in stud cavities, often supplemented with a layer of continuous rigid foam on the exterior to reduce thermal bridging through studs.
- Existing wall cavities (retrofit):
- Blown-in insulation or injection foam, which can be installed through small holes drilled from the exterior or interior, minimizing disruption.
- Basement walls and rim joists:
- Rigid foam board or closed-cell spray foam on the interior of foundation walls handles moisture exposure better than fiberglass batts, which can trap moisture and degrade over time in these environments.
- Crawl spaces:
- A sealed, conditioned crawl space with rigid foam or spray foam on the walls generally outperforms the older approach of insulating the floor above with batts.
DIY vs. Professional Installation
Fiberglass and mineral wool batts in accessible, open framing cavities are genuinely approachable for a careful DIYer. Blown-in insulation in attics is also manageable - equipment rental and bagged insulation are widely available - though following manufacturer guidelines on depth and coverage density is critical.
Spray polyurethane foam, by contrast, is not a DIY-friendly product in its professional two-component form. Improper mixing ratios or application temperatures produce foam that off-gasses harmful chemicals or fails to cure correctly. Small canned foam (the single-component type used for gaps around windows and pipes) is safe and useful for targeted air sealing, but it is a different product from the two-part SPF systems used for large-area insulation.
Spray Foam Requires Professional Application
Any insulation work that involves disturbing existing materials in a home built before 1980 warrants testing for asbestos before proceeding. Similarly, any work near electrical wiring, gas lines, or structural members should be evaluated by the appropriate licensed professional. Many jurisdictions also require permits for significant insulation work, particularly when it involves changes to the building envelope or spray foam in unvented assemblies - check local requirements before starting.
Common Insulation Mistakes to Avoid
Even experienced DIYers make a few recurring errors that undermine insulation performance.
- Compressing batts: Stuffing an R-19 batt into a cavity too shallow for it compresses the material and reduces its effective R-value. Always match batt thickness to cavity depth.
- Skipping air sealing: Insulating over unsealed gaps is one of the most common and costly mistakes. Air sealing first with caulk and foam dramatically improves results.
- Covering attic vents: In vented attic assemblies, soffit and ridge vents must remain clear. Blocking them causes moisture problems and can void roofing warranties.
- Installing faced batts backwards: The kraft paper or foil vapor retarder on faced batts should face the warm-in-winter side of the assembly (usually the interior). Reversing this can trap moisture inside the wall.
- Ignoring thermal bridging: Wood studs conduct heat much more readily than the insulation between them. In cold climates, a layer of continuous rigid foam over the framing significantly reduces this effect.
This article provides general educational information about insulation materials and concepts. It is not a substitute for advice from a licensed contractor or building professional familiar with your local codes, climate conditions, and specific home construction. Always verify local permit requirements and consult qualified tradespeople for work involving hazardous materials, complex assemblies, or regulated systems.
The content on this site is for informational purposes only and is not a substitute for professional advice. Always consult a qualified professional for guidance specific to your situation.